
The table rate shipping method lets you calculate shipping rates for a combination of conditions using editable data. The shipping rate can be based on the following calculations:
- Weight vs. Destination
- Price vs. Destination
- # of Items vs. Destination
For example, if your warehouse is located in Los Angeles, it costs less to ship to San Diego than to Vermont. You can use table rate shipping to pass the savings on to your customer.
Only one set of table rate data can be active at any time. The data that is used to calculate the rate is prepared in a spreadsheet and imported into your store. When the customer requests a quote, the results appear in the Estimate Shipping and Tax section of the shopping cart.
Step 1: Complete the Default Settings
- In your Control Panel, go to Set-up > Shipping. If Table Rates is not shown, click on Add Shipping Method, choose the Table Rates box, and click Click the Add Shipping Methods bar that appears at the bottom of your page.
- Click on Set-Up next to the Table Rates section to view your configuration settings.
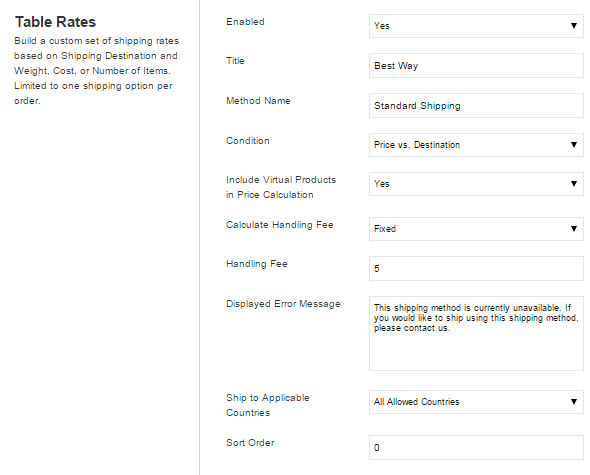
- Change Enabled for Checkout to Yes
- In the Title Field, enter a name that will be used to refer to this shipping option during checkout (example: Recommended Shipping).
- In the Method Name enter a name that best describes how these are being shipped such as "Standard Shipping".
- Choose the conditions your rates will be based off of:
- Weight vs. Destination
- Price vs. Destination
- # of Items vs. Destination - If you are using Price vs. Destination to determine the shipping cost, you can choose to Include Virtual Products in Price Calculation. The prices for these items will be added to those that are being shipped and used in the calculations.
- The handling fee is optional and appears as an additional charge that is added to the shipping cost. In the Calculate Handling Fee list, select the method you want to use to calculate handling fees:
- Fixed: Certain amount per order regardless of size
- Percent: Percentage of the order total price - In the Handling Fee field, enter either a fixed amount or percentage, depending on which you selected in the Calculate Handling Fee field. These values should be a number, no currency ($) or percentage (%) symbols
- Edit the Displayed Error Message as needed. This message appears when a selected method is unavailable.
- Set Ship to Applicable Countries to one of the following:
- All Allowed Countries
- Specific Countries
Remember, any countries you allow this rate to be used for either must be specified in your CSV or use * for all unspecified countries. - In the Sort Order field, type a numeric value to determine the sequence in which this shipping method appears when listed with other shipping methods during checkout.
- When complete click the Save button to save your changes.
Here's an example of what this may look like once you're done:
Step 2: Prepare the Data
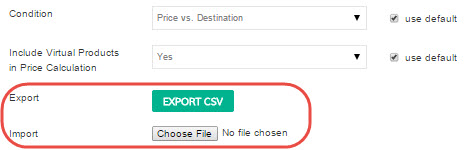
The table rates are entered by importing a CSV file. First export the file by selecting the Export CSV button. Save the file to your computer and open it in Excel or your spreadsheet editor of choice. Please note that you will need to have your Configuration Scope in the top right hand corner set to the website you are working on, not Default Configuration in order for these options to show up.
Once the CSV file is open in Excel you can enter your rates.

We are going to have 3 rates in this case, $15 for orders $0 - $49.99, $10 for orders $50 - $99.99, and $5 for orders $100 and up. As it says in the CSV, the rates are calculated on the order sub-total. As with all order sub-totals this is the sub-total AFTER other discounts are added. So if a customer applies a coupon, the sub-total after the coupon is applied is the rate we calculate against.
In the case of price and destination the first rate you will need to enter is for the order sub-total of $0 and above. In this example we are going to set up a single rate for every region in the USA. First we enter the Country as USA. If we don’t want to specify a rate for each individual region/state we enter a * in the field. This applies the rate to all regions in the country. We will do the same for all ZIP codes in this case as well.
You then save the file and upload it back to the site using the Import tool for the Table Rates in the control panel. We now have a simple table rate set up for all orders to the USA. However, let’s say you find you are shipping to customers in Hawaii and Alaska frequently and are losing money each time you do so. We can set up different rates just for those 2 states. Export the file back out of the site and you will be able to view the current rates for the site. Now we can enter higher rates for Alaska and Hawaii by entering them in the CSV file.

By entering the states in the CSV the site will now look for these rates anytime a customer enters a shipping address in either of these states. The states must be entered using the 2-digit Postal Abbreviation. In this case we still have the * for the first 3 rates. Instead of meaning all states, the * now means all states EXCEPT for HI and AK.
Save the file and import it back to the site, select the Save config button and you have your new table rates.
The other 2 options, Weight and Destination and # of Items and Destination, function in the same way, but instead of looking at the Sub-total they will calculate the rates based on either the total weight of all items in the cart or the total number of items in the cart.
To view country and state codes for table rate shipping, follow these links:
Step 3: Import the Data into your Store
You'll find this just below where you exported the CSV file earlier.
Comments
0 comments
Please sign in to leave a comment.