
This article discusses Root Categories and their role in your store. You will learn how to create new root categories and manage which is shown of the root categories.
To understand what a root category is, it's best to first describe the context in which it belongs. Products are logically organized into categories. Categories are logically organized into a root category. It's safe to say that the root category is the alpha category, the highest level in the hierarchy of your store catalog. By Default, you start with one named "Root Category" although you can change this title at any time by clicking on it, and editing the Name field and saving.
Many of our customers find it easier to think of it like this:
Your Root Category is your store
Your Subcategory is the departments within your store.
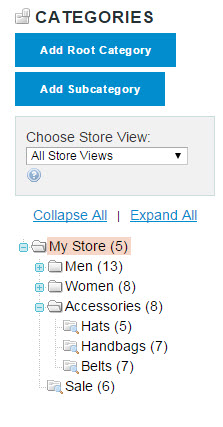
In the screenshot above "My Store" is the Root Category. Men, Women, Accessories and Sale are all Subcategories. Some have subcategories inside them as well.
Zoey allows you to create new root categories, but it's important to know a few things before you start creating new ones. Be aware that your store can have only one root category active. This makes sense, because there can be only one alpha.
This has been a point of confusion for some who wonder why the products and categories in their second, or third root category are not visible in their store. The solution is simple: you must choose the root category that you want to use with your store in Set-up > Site Configuration then click "Manage Stores", as explained below.
The Correct Way to Create a New Root Category
Step 1. Create a new root category
- From the control panel, select Catalog > Categories.
- In the upper-left of the Manage Categories page, click the Add Root Category button.
- In the Name field, type in the name of the root category.
- Set Is Active to Yes.
- On the Display Settings tab, and set Is Anchor to Yes.
- Click the Save Category button.
Step 2. Create the subcategories within the new root category
- From the Categories page, in the category tree on the left, click to highlight the new root category.
- Click the Add Subcategory button.
- Give the subcategory a Name and set Is Active to Yes.
- Click the Save Category button.
- Repeat this step as needed and add as many layers as needed to complete your category tree.
Step 3. Link the new root category to your store.
- From the control panel, select Set-up > Site Configuration > Manage Stores.
- From the Manage Stores page, click on the Store Name which is by default Store to edit.
- Change the Root Category to the new root category.
- Click the Save Store button.
Comments
0 comments
Please sign in to leave a comment.